Setting Up A Cron Job
It is important to understand that Mailster is a part of Joomla which is a PHP based web application. That means: it can not act/run without being triggered and it can not run forever when triggered. This is a technical limitation coming from PHP, not from Mailster or Joomla. Triggering means that somebody accesses the site. During the page load Mailster is handling the jobs to do (mail retrieving and sending).
Thus mails can only be send/retrieved when somebody is browsing your site, otherwise the delivery is delayed or never done. As your site might not be browsed every few minutes 24x7 we recommend you to use a cron job that opens the site periodically.
There are three options available for cron jobs: The differences between the three are explained in the following.
This is the easiest way to setup a cron job - we host a cron job for you. When you are a paying subscriber of Mailster, then you already have one cron job included that we will setup for your site. You can do this by logging into your account at our site (http://wwww.brandt-oss.com/).
There you will find a section where you can manage your cron jobs. Depending on the Mailster product you are using there are already one or multiple cron jobs included. Here you can also purchase additional cron jobs or extend the yearly subscription period.

The cron job services provides this features:
There you will find a section where you can manage your cron jobs. Depending on the Mailster product you are using there are already one or multiple cron jobs included. Here you can also purchase additional cron jobs or extend the yearly subscription period.

The cron job services provides this features:
- Cron Job service for 1 year
- Triggers the Mailster installation on your Joomla site
- Site is triggered at least
- every 15 minutes (Basic Cron Job Service) or
- every 5 minutes (Power Cron Job Service)
- every single minute (Sprint Cron Job Service)
- Make Mailster deliver emails quick and reliable on low-traffic sites
- Suitable for all Mailster product versions (working with both lazy and dedicated cron job mode)
We offer the Mailster Cron Job Service as a managed service on subscription basis. It can be booked independently although the following subscriptions are included when you purchase our products.
Included cron job service:
- Mailster (Free): None
- Mailster Essential: Basic Cron Job Service (1 Site, 1 Year)
- Mailster Business: Power Cron Job Service (1 Site, 1 Year)
- Mailster Ultimate: Sprint Cron Job Service (1 Site, 1 Year)
If you run more than one Mailster installation you purchase multiple cron job subscriptions as needed.
This type of cron jobs work by simply opening your Joomla webpage periodically. So it basically means a program browses an URL of your site.
The (sub-)URL of the cron job is not important, as Mailster is working during the pageload and the content of the loaded page itself is not interesting. You might want to point the cron job to the administrator login screen to avoid too much traffic and false page hit statistics.
Here is an option of a cron job that is executed every 5 minutes using the command-line tool wget:
If you can only run PHP scripts as cron jobs you can create a PHP file with the following content:
If you have use a cron job targeted at your administrator screen you can also avoid page load delays for your site vistors. This can be done by setting the system plugin "Mailster Email Forwarder" which is responsible for retrieving/sending emails to only execute by page accesses in the backend. The setting can be changed here:
The (sub-)URL of the cron job is not important, as Mailster is working during the pageload and the content of the loaded page itself is not interesting. You might want to point the cron job to the administrator login screen to avoid too much traffic and false page hit statistics.
Here is an option of a cron job that is executed every 5 minutes using the command-line tool wget:
*/5 * * * * wget -O – -q "http://example.com/administrator/index.php" >/dev/null 2>&1
That's the best option in order to not download/save anything while executing wget - otherwise you would save the returned HTML on each cron job execution. Note that you have more options in terms of command-line programs to use (e.g. lynx or curl). You have to see what is available and working on your host. If you can only run PHP scripts as cron jobs you can create a PHP file with the following content:
<?php
$html_data = file_get_contents('http://example.com/administrator/index.php', 'r');
echo 'Job done!';
exit;
?>
$html_data = file_get_contents('http://example.com/administrator/index.php', 'r');
echo 'Job done!';
exit;
?>
If you have use a cron job targeted at your administrator screen you can also avoid page load delays for your site vistors. This can be done by setting the system plugin "Mailster Email Forwarder" which is responsible for retrieving/sending emails to only execute by page accesses in the backend. The setting can be changed here:
- Navigate in Joomla's backend to the Plugin Manager (Plugins > Extensions)
- Find the system plugin "Mailster Email Forwarder" (Note: this is not the content plugin "Mailster Subscriber")
- Search for the setting "Trigger Source":

- Change the setting to "Backend activity only":

This type of cron jobs have the advantage that they do not cause page load delays for site users at all.
To use it you will have to change the "Trigger Source" for Mailster accordingly. The setting can be changed here:
In order to build the cron job go to the directory [joomla]/components/com_mailster/extras and copy the file cronjob_mailster.php to a folder on the server executing the cron job.
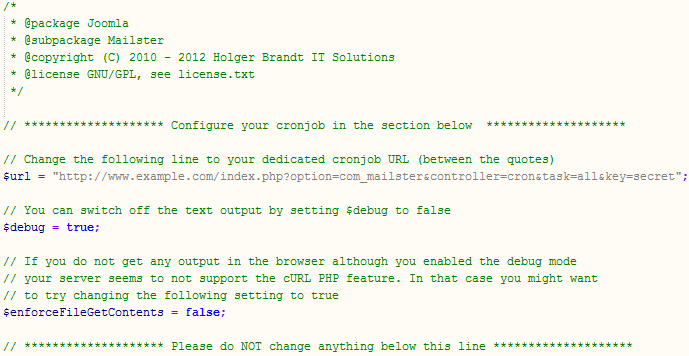
Then open it in a text editor. It should look as follows:  You will need to modify the URL (as described in the file). The other options (debug and the enforcement of the "file_get_contents" method) do not need to be changed in most cases.
Change the URL from http://www.example.com to the URL where your Mailster installation is running. Do not forget to add the whole path of your Joomla installation - if you installed it in a subdirectory you also have to add that (e.g. http://www.example.com/cms/index.php?option=com_mailster&controller=cron&task=all&key=secret).
Now let's take a closer look at the URL parts...
Dedicated cron jobs work with special URLs, one example:
Working with the all task is the recommended dedicated cron job setting and suitable for most setups. However, there are more tasks available for dedicated cron jobs:
Further examples:
Retrieve and send in one run, cron job key was set to "secret":
Retrieve emails for all active mailing lists:
Retrieve emails for mailing list with ID 3:
Work on emails in send queue:
Debug mode:
To check whether the cron job is successfully executed you can copy the cron job URL into the browser and append this: &debug=true.
Example (retrieves emails from the the mailing list with ID 1, the debug mode is active):
You should get an output like the following:
Adding the debug URL parameter is done by the cronjob_mailster.php script, when the debug flag is set to true.
Finishing up
Let's get back to our cron job file and what we need to do with it.
Dedicated cron jobs are only available in Mailster Business and Mailster Ultimate.
To use it you will have to change the "Trigger Source" for Mailster accordingly. The setting can be changed here:
- Navigate in Joomla's backend to the Plugin Manager (Plugins > Extensions)
- Find the system plugin "Mailster Email Forwarder" (Note: this is not the content plugin "Mailster Subscriber")
- Search for the setting "Trigger Source":

- Change the setting to "Dedicated cron jobs only":

In order to build the cron job go to the directory [joomla]/components/com_mailster/extras and copy the file cronjob_mailster.php to a folder on the server executing the cron job.
It is important that you copy it to a different location before you go any further. Otherwise the file is overwritten during the installation of an update for Mailster.
 You will need to modify the URL (as described in the file). The other options (debug and the enforcement of the "file_get_contents" method) do not need to be changed in most cases.
Change the URL from http://www.example.com to the URL where your Mailster installation is running. Do not forget to add the whole path of your Joomla installation - if you installed it in a subdirectory you also have to add that (e.g. http://www.example.com/cms/index.php?option=com_mailster&controller=cron&task=all&key=secret).
Now let's take a closer look at the URL parts...
Dedicated cron jobs work with special URLs, one example:
http://example.com/index.php?option=com_mailster&controller=cron&task=all&key=secret
The meaning of the parameters:
- option=com_mailster and controller=cron: the general call of Mailster's dedicated cron job mode
- task=all: call the "all" cron job tasks, more on the different tasks below
- key=secret: this key has to be the same as the cron job key you provided in Mailster's configuration:

Use only lower- and/or upper-case alphanumeric characters (0-9, a-z, A-Z) in your cron job key. Other characters may need to be manually URL-encoded. This is error prone and can cause the Mailster actions to never start.
- all: sends and retrieves emails for all mailing lists. Recommended in most cases, but not recommended for big mailing lists or high traffic lists.
- fetchall: retrieves emails of the mailboxes of all active mailing lists
- fetch: retrieves the emails of the mailbox of one mailing list the emails in the mailbox.
You have to provide the mailing list to use with the "id" parameter (e.g. &id=1) - send: sends out mails in the send queue
Further examples:
Retrieve and send in one run, cron job key was set to "secret":
http://example.com/index.php?option=com_mailster&controller=cron&task=all&key=secret
Retrieve emails for all active mailing lists:
http://example.com/index.php?option=com_mailster&controller=cron&task=fetchall&key=secret
Retrieve emails for mailing list with ID 3:
http://example.com/index.php?option=com_mailster&controller=cron&task=fetch&id=3&key=secret
Work on emails in send queue:
http://example.com/index.php?option=com_mailster&controller=cron&task=send&key=secret
Debug mode:
To check whether the cron job is successfully executed you can copy the cron job URL into the browser and append this: &debug=true.
Example (retrieves emails from the the mailing list with ID 1, the debug mode is active):
http://example.com/index.php?option=com_mailster&controller=cron&task=fetch&id=1&key=secret&debug=true
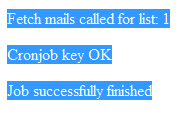
You should get an output like the following:

Adding the debug URL parameter is done by the cronjob_mailster.php script, when the debug flag is set to true.
Finishing up
Let's get back to our cron job file and what we need to do with it.
- Change the URL in the cronjob_mailster.php file by replacing the URL between the quotes: $url = "[...]". Again: in most cases the all task is suitable and should be used.
- You can leave the debug flag active ($debug = true;) in order to see whether the cron job works. You can turn it off later ($debug = false;).
- Save your changes to the cron job file
- Now setup the cron on your server. There are two common ways to do this:
- Method 1: Create a cron job via your cPanel
This method applies only if your webhoster offers you a graphical administration interface (cPanel) with cron job functionality.
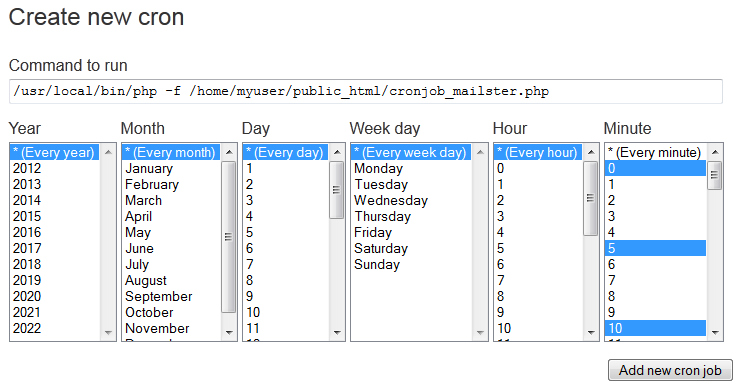
Most interfaces look similar to the following screenshot: You specify the frequency of the cron job executing by selecting the appropiate options. We recommend to create a cron job that is run every 5 minutes. Do this by selecting the every year/month/day/week day/hour option and by selecting multiple minutes in a 5 minute interval (e.g. 0/5/10/15/20/25/30/35/40/45/50/55).
You need to pay attention what you insert as the command to run. The first part, /usr/local/bin/php on our server, is the path to the PHP executable. This is a little different for each webhosting environment - but in most cases well documented in the hoster's setup guide. On some servers it is enough to write php or php5 without an exact path.
The second part, the parameter -f, tells PHP to parse and run a file. It is optional and may be omitted.
The last part is the path to the file, relativ from the root directory (that you can access). A good way to figure out this path is to login via a FTP client and navigate to the root. From this root the whole path to the cronjob_mailster.php file has to be used for the cron job command.
Most cPanel offer a way to review the cron job result, either by logs or by emails. You should use this at first to see whether you get the desired output (as previously when you accessed the cron job URL with the &debug=true parameter with your browser). - Method 2: Create a cron job from a terminal
This method applies only if you have command-line access to your (Linux) server and the suitable user rights.
Edit /etc/crontab with a text editor and add the following line: * * * * * php /path/to/your/cronjob_mailster.php
This is the scheme of the crontab file:Minutes [0-59] | Hours [0-23] | | Days [1-31] | | | Months [1-12] | | | | Days of the Week [Numeric, 0-6] | | | | | * * * * * php /path/to/your/cronjob_mailster.php
The * means "every". So our line makes the cron job run every minute (in every hour, day, month, year). As this might generate too much unnecessarily server load we change it to "every 5 minutes": */5 * * * * php /path/to/your/cronjob_mailster.php
For small, low traffic lists (e.g. announcement mailing lists) you might find an "every hour" setting more suitable: 0 * * * * php /path/to/your/cronjob_mailster.php
Basically every interval is possible. Many more examples on the crontab's syntax can found on the web, e.g. on Wikipedia (see http://en.wikipedia.org/wiki/Cron).
- Method 1: Create a cron job via your cPanel